Sunday, January 10, 2010

Liquid Glass!

One of my very favorite products from Close To My Heart is Liquid Glass. You might think this is a funny choice... it has no colorful component to please my eyes, it doesn't coordinate with other papers or embellishments, it just adds little accents here and there or works as a strong adhesive.

EXACTLY!! It can highlight a little swoosh or swirl, it can make a word *pop* out from other words, it can add the tiniest bit of shine to a spot that "just needs something" like a little tear drop. I love it!

It also thinks it's glue. I try to tag my new Christmas tree ornaments each year with the year and the name of the giver. It gets a little tricky to get the tag tiny enough to be nearly invisible and then to find an appropriate place to adhere it. Liquid Glass to the rescue this year! All new tags were easily placed and no worries that they will fall off! My daughter even used it to fix the broken frame of her glasses for a week or two until she got new ones. Yes, I am serious.

Now I want to tell you what you can do with a little bit of ribbon, some glue dots and some waxy flax that will enhance your Liquid Glass.

Some crafters, unlike me, are very organized and never ever misplace anything. You know the ones, they always have exactly what they need at their finger tips! With Liquid Glass that one thing you need is a pin to reopen the passageway for the Liquid Glass to flow. For a while I just kept the pin in the bottle and didn't use the cap, but that can create problems if you want to leave home with it.

So today I took a length of ribbon (Juniper from the Jingle Creative Basics package) and used glue dots to adhere it to my bottle of Liquid Glass. I made a couple of ribbon loops in the middle and pushed them to one side. To be sure this ribbon would stay on my bottle for a long time (hopefully until it's empty) I tied a piece of waxy flax over the top of it.

Then, the really cool part!!

I pushed a safety pin through the ribbon, where the loops are, and closed it. I will never ever be looking for a pin to unstick the tip of the bottle again!

I feel so clever!!

Friday, January 1, 2010

Christmas Cards

Now that Christmas has come and gone I can share the cards I sent out this year. If you didn't get yours let me know and I'll check into it. It could be because I didn't get one from you so I had no return address to mail to.... That's my little attempt at humor today.


I was so intent on getting my cards all mailed out before Christmas, a change I decided to implement this year, that I forgot to take photos of this one. A big thanks to Susan and Dennis for emailing me a photo of their card.


When I began running short on time I switched over to a set of cards designed by my friend Shari. Her awesome instructions allowed me to crank out another 20 cards in record time. I tweaked in a couple of places but most of the cards are a straight stamp lift. I apologize to anyone who received on of these and thought it was my original work, which it was stamped as on the back, but only because I wasn't able to find a stamp with simply my name. My apologies to you, too, Shari.


Tuesday, December 15, 2009

...and the Shoppers Rush Home with Their Treasures!

What a month it has been! Or a couple of months for that matter! I thought I had my Christmas all "wrapped up" at the beginning of the month but I find myself busier and behinder than ever as the days march along. How can this possibly be??

I signed up for a recipe swap at the last possible minute. What kind of fool am I? Being an ace procrastinator and a struggler of ideas, I thought it would behoove me to go another step and sign up for three spots. I think I need my head examined. Oh, did that already, too.

Because I was terrified to let my husband know I had committed to another thing, I was trying to be sneaky about working on this swap - like in between stamping gift tags and Christmas cards. I didn't quite get away with it and he found me out... but not until I was almost completely done. I got them into the mail only one day late. That could be some sort of record!

The swap was 6x6 Crock Pot Recipes, CTMH products only since the players were all CTMH consultants.

Chicken soft tacos is my submission for the Main Dish category. I chose the colors based on the Mexican flag.

German Potato Salad is my Side Dish entry. Also based on flag colors, Germany this time, Black, Red & Gold.

My final submission is in the Desserts category, Cinnamon Raisin Bread Pudding in shades of browns. I should get 5 more back in these categories - I'll share them when I do.

Merry Christmas!!

Friday, October 9, 2009

YAY for me!!

It's official!

I finally have one thing....

Yes

ONE

thing....

O

N

E

thing...


organized in my craft room!!

My beautiful Close To My Heart papers are comfy & cozy in their own special slots. Each one marked with the color and name of the paper. How special are they??


My husband put in three of these double door units for me a few months ago. You can see they just fit below the lowered section of the ceiling. We wanted to keep them away from the wall on the right because of the air intake. It occurred to me that taking my paper rack off the table and re-orienting it to stand up and down in the corner would fill the space in question and still not block the intake. It also means more work space on the table!! It meant taking apart and rebuilding the rack but I love the results!! I turned the slots vertical on the botton two cubes and have a great place to store my Close To My Heart eyelet case, ribbon case, acrylix blocks case and a few other items.


Although it doesn't appear so, I do have paper in every single slot!


While cutting the tags for IDing my papers, I also made up the season color cards for the wall. Now that they are there, I am not sure what their purpose is... **blushing** but they are in order of the catalog listing and also stored in the same order.
OMHeck, I feel so dang organized!!!!!

Creative Basics Jingle - Part II

Seems like today may be a good time to get back to business here and follow up with those 6x6 cards I started with the Jingle Creative Basics pack.

NOTHING could be easier than creating cards with the ideas and instructions found in our Wishes book. Fabulous is the best way to describe the results!!


Switched this one up with a different stamp set. I love the snowflake 'O' in the word and how fun is it to add brads? Don't forget, in this case a spool of Juniper colored ribbon is included with the paper!


The beautiful colors of Tulip and Juniper and the patterned paper really make a nice composition without too much embellisment. In this case I tried my hand with the glitter rub-ons. I need a little more experience with them!

I truly love Love LOVE my liquid glass!! And have I ever mentioned that I am still using up the very first bottle I bought? Sometimes I think it's a magic bottle that will never become empty. It simply goes so very very far!! I dotted the ornaments, stars and decoratios on all three little red trees. So pretty in person!

I simply love this ornament stamp set. The saying is available in English, French or Spanish. I can hardly remember the last time I actually used my markes to color in anything. I almost forgot how fun it is!

More coloring with markers! Once I started it was hard to stop!! When I cut the central ornament out I also sponged a little juniper around the edges to make it look more round. In the background I masked the 'front' ornament to stamp the 'back' one. Then, without removing the mask I also sponged a little shadow between them for added depth.
Thanks for stopping by today. I hope you like what you see!

Wednesday, September 30, 2009

Evolution of scrapbooking - a personal story


I don't recall much fuss being made about scrap books when I was a kid. Although it's true that my mother saw most of her vacations and travels through the view finder of her camera, she stuck mainly to slides, which don't elicit much response when attached to the pages of a photo album. Even as a kid I found those family slide shows much too boring to sit through. I have to wonder why we forced those events upon family, friends and neighbors. Not only the blurry out-of-focus photos or 12millionth view of the same subject, but the monotone voice of the man or woman behind the slide machine droning on and on and on and . . .

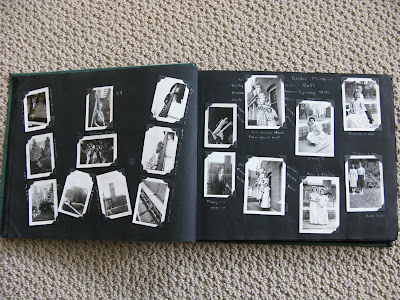
It can only be described as extreme delight that I discovered Mom did keep a photo album of her years in college. What a happy treasure to have! It covers her college life and summers from the late 1930's to the early 1940's. Black and white photos with within white borders, adhered with photo corners to black pages with descriptions written in white. All bound in an embossed album adorned with a decal of her school, Washington State College, many years later to become Washington State University or WAZZU as we fondly like to call it.
I'm about to share pages from this album with you. I doubt I'll have a lot to comment on and I am sure they mean a lot more to me than to you. But this is not only part of my ancestry, it's part of the evolution of scrapping in my family.


The first page which appears to be an untitled title pages is an aerial view of the Washington State College campus most likely taken in the late 1930's.
College dorm mates of Steven's Hall ready for their first formal dinner. My mom is the woman in the lower left corner.

My mother always claimed to have no artistic ability but this album proves that she is more creative than she gives herself credit for. Notice the left page photos of campus scenes form a "W" for her school.
All dressed up for the "Masqued Ball." I like how Mom cut out some of the figures in this layout.

I think the use of different size photos really adds interest to this album. She was very good about labeling the photos, although I wish she had spent a little time journaling, too.

Mom was a veterinary student and I love that she has photos from her lab classes! In those days it was very unusual for a woman to study in this field.

More veterinary labs....

I really appreciate that Mom put a lot of photos of herself in her album. This is something a lot of women neglect to do! I particularly like this photo. Mom had the honor of standing up with the other woman in the picture when she married. 60 years later I drove Mom to the 60th Wedding anniversary of this same friend.

One of Mom's old flames in the upper right. I don't know who drew the little guy diving into the water but I love it!

More little sketches accent the page.

I love how she put the photos together on this page.

Mom went to school a long way from home (for those days). The couple in the upper photo are her parents (my grandparents) on Dad's Weekend in 1941. The girls in the lower photo are from the cross state rival school... you may have heard of the University of Washington Huskies...

Love the caption on this page... if you can't read it, it says.... "How the Old Maids Club amused itself on the weekends."

Sophomore year (1942) back in the animal anatomy lab.

Another one of my favorite pages.... Mom's sister and brother in law, Aunt Jean and Uncle Ernie.

I like how Mom grouped the photos of herself dressed up for the Veterinarian Hobo Dinner.

Another grouping of photos that I really like.

This page really amuses me. She captioned it, "Snow Scenes" but seems to have cut much of the snow out of the photos! LOL

Once again, I really appreciate the number of photos Mom included of herself in her album. And on this, the last page I will share with you, I love her photo montage in the upper right.

Tuesday, September 29, 2009

Creative Basics - Jingle

When I ordered my new toys from the CTMH Winter 2009 Idea Book I got a paper packet called Creative Basics Jingle Collection - page 30 if you want to follow along in the book... Last night I cracked open my Wishes Card Confidence program and selected the Celebrations Workshop to use this paper with. This workshop uses only 2 sheets of the background texture papers, 2 coordinating sheets of cardstock and 6 more cardstock for the 6" x 6" cards bases. With that, I can create 12 beautiful cards, two each of 6 designs.

I chose White Daisy, Juniper, Hollyhock & Tulip for my bases. Since it was pretty late in the evening all I did was cut all the papers according to the cutting guide in Wishes and organize the bases with the cut pieces. I decided to not do the same color bases for the 2nd card of each design to see how different they would look. I had time to make up three of the 12 cards. Take a peek!!
The Juniper grossgrain ribbon is included with the Creative Basics Jingle Collection papers. I tied the white craft buttons with natural hemp and sponged them with Tulip and Juniper inks.
More natural hemp (sponged with Juniper ink) knotted and attached to the card with Liquid Glass. Pretty glittery Twinkle Brads adorn the center of the snowflakes.

The Holiday Trinkets My Acrylix stamp set is what I have used for all of these cards. I really like the simplicity of this card, and distressing paper is one of my very favorite techniques!
I have nine more cards to do with this project... hurry back!!