EXACTLY!! It can highlight a little swoosh or swirl, it can make a word *pop* out from other words, it can add the tiniest bit of shine to a spot that "just needs something" like a little tear drop. I love it!
It also thinks it's glue. I try to tag my new Christmas tree ornaments each year with the year and the name of the giver. It gets a little tricky to get the tag tiny enough to be nearly invisible and then to find an appropriate place to adhere it. Liquid Glass to the rescue this year! All new tags were easily placed and no worries that they will fall off! My daughter even used it to fix the broken frame of her glasses for a week or two until she got new ones. Yes, I am serious.
Now I want to tell you what you can do with a little bit of ribbon, some glue dots and some waxy flax that will enhance your Liquid Glass.
 Some crafters, unlike me, are very organized and never ever misplace anything. You know the ones, they always have exactly what they need at their finger tips! With Liquid Glass that one thing you need is a pin to reopen the passageway for the Liquid Glass to flow. For a while I just kept the pin in the bottle and didn't use the cap, but that can create problems if you want to leave home with it.
So today I took a length of ribbon (Juniper from the Jingle Creative Basics package) and used glue dots to adhere it to my bottle of Liquid Glass. I made a couple of ribbon loops in the middle and pushed them to one side. To be sure this ribbon would stay on my bottle for a long time (hopefully until it's empty) I tied a piece of waxy flax over the top of it.
Then, the really cool part!!
I pushed a safety pin through the ribbon, where the loops are, and closed it. I will never ever be looking for a pin to unstick the tip of the bottle again!

I feel so clever!!


 Chicken soft tacos is my submission for the Main Dish category. I chose the colors based on the Mexican flag.


 I truly love Love LOVE my liquid glass!! And have I ever mentioned that I am still using up the very first bottle I bought? Sometimes I think it's a magic bottle that will never become empty. It simply goes so very very far!! I dotted the ornaments, stars and decoratios on all three little red trees. So pretty in person!
 I simply love this ornament stamp set. The saying is available in English, French or Spanish. I can hardly remember the last time I actually used my markes to color in anything. I almost forgot how fun it is!
 More coloring with markers! Once I started it was hard to stop!! When I cut the central ornament out I also sponged a little juniper around the edges to make it look more round. In the background I masked the 'front' ornament to stamp the 'back' one. Then, without removing the mask I also sponged a little shadow between them for added depth.


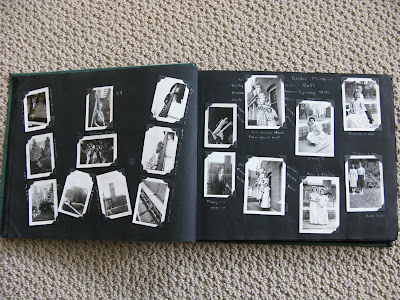

 I think the use of different size photos really adds interest to this album. She was very good about labeling the photos, although I wish she had spent a little time journaling, too.
 Mom was a veterinary student and I love that she has photos from her lab classes! In those days it was very unusual for a woman to study in this field.


 More little sketches accent the page.


