Wednesday, December 1, 2010

Paper Trail December Blog Hop - Magnifique!


Welcome to the December edition of the Paper Trail blog hop! This month we are featuring Close To My Heart's "Magnifique" paper packet. If you arrived here from Karen's blog, Inky Fingers, you are on the right trail!


One of many things I particularly like about the Close To My Heart papers is their double sided patterns. These four cards were designed for my Holiday Card Workshop using Magnifique. The sky blue monochromatic side of the papers was perfect for a wintery feeling. Stamps featured in this card are from the Father Christmas My Acrylix stamp set.

Large patterns of peacock feathers are disguised as a random design when used in small pieces and perfectly accent the card. Winter scene is from Captured Moments.


I broke one of my rules here and used more than one or two stamp sets. But when you already have them and the card just needs that little more.... Sometimes you just gotta break the rules. My Acrylix stamp sets used are, Ice Crystals, Unity, and All the Best from the Mistletoe Workshop on the Go.


My final card is not so holiday-ish but is a winter card. I love this stamp set, Nature's Gift.

Thanks for stopping by, I hope you've enjoyed my cards. You're on your way to Mary's blog, Road to Peace of Mind or Escape now for some more great ideas.

Friday, November 26, 2010

Cyber Monday CTMH Sale!

Did you stay home and warm on Black Friday but now need a start on your shopping? Cyber Monday is coming and I have some great offers for you!


When you submit an order of just $30 you receive your choice of any embellishment or supply item up to $3.00 for free! Look for Opaques, Sparkles, Envelope Flats and more!

When you submit an order of just $60 you receive a second choice of any embellishment or supply item up to $4.00 for free! Look for Filigree Charms, Waxy Flax, My Creations A-door-ables and more!

When you submit an order of just $90 you receive a third choice of any embellishment or supply item up to $5.00 for free! Look for Mini-Medley My Accents Collections, Brad Assortments, Dimensional Elements and more!


When you submit an order of just $100 you will receive all of the above and the November Constant Campaign, “A Little More Thanks,” also kicks in! You receive the Stamp of the Month, “A Little Thanks,” for free and a second stamp set of your choice, also for free!
This Cyber Monday special is available only through me, personally. Please email me (betsygully@gmail.com) with your order from 8:00am through 11:59pm on Monday, November 29th only. Close to my Heart requires that I collect shipping & handling and tax on all free items. This sale is NOT available through my website.

Need ideas for the scrapper or crafter in your family?
Studio J 5-pack is a great introduction to digital scrapping. A Studio J® 5-pack, priced at $55, includes 5 two-page layouts, 5 Memory Protectors®, and free shipping and handling. It’s the perfect way to try out Studio J for the first time, and it makes a great gift. (3 and 12 month memberships are also available at even greater benefits and savings.)


Protect and showcase your treasured scrapbook pages for a lifetime in one of Close To My Heart’s archive quality My Legacy® albums. Just $24.95 they are available in six contemporary colors. Our post-binding albums are more beautiful and durable than ever.

A Close To My Heart gift certificate is always a wonderful gift to allow your favorite scrapper or crafter to choose exactly what she wants with no uncertainties about color, duplicates or personal tastes. A Gift Certificate can be purchased in any amount. Gift Certificates do not count toward Cyber Monday sales.

Tuesday, November 23, 2010

Stocking Stuffers!


I love Christmas. Besides looking forward to seeing family, shopping, eating, partying and honoring the birth of Jesus, it's also a great time to be a paper crafter. I get to design and make my own Christmas cards. I love sending out cards that mean more to me than a pretty picture and a pretty saying. I know that not all recipients appreciate the time and effort it takes to make my cards, but the process of making them and thinking about the friends and family I'll be sending them to is very important to me, a tradition I adore.

Besides making cards there are so many other holiday things to make by paper crafting. I'm certainly not as creative as so many of the crafters I admire, but I do have fun! This photo is of five items we are creating in my next workshop. They can be small gifts for people you want to acknowledge with a little something or they can be stocking stuffers, or perhaps, like the ornament or notebook, you can keep it for yourself. However they are used, they are sure to be appreciated!

Let the holidays begin! I so love this season!!

Saturday, November 20, 2010

Happily Exhausted!

Today was the final of my three holiday card classes. It's been a long three days as we tried to squeeze so much fun into each class. Hm... Might try for a little less fun next time!
Our prepped cards were all lined up on the piano one through ten. Grab a box, pass it around and we're off!

This is our Saturday class, number three. Alyssa, my partner in crime, managed one end of the table and I managed the other. It was her first time to really teach and she was fabulous!

Without a doubt all the stampers were tired at the end of the class, but happy with their cards! My favorite quote of the day? "There's not a single card I don't love!"


Thursday, November 18, 2010

Holiday Card Workshop


Today we had the first of three Holiday Card workshops. Every participant received a thank you gift from me before we jumped in and made 20 holiday cards, ten designs, 2 of each. We had yummy Christmas cookies and non-stop Christmas tunes. Don't shame me for breaking out the Christmas tunes too early, it's necessary to have the appropriate music when making Christmas cards! We had so much fun!

There are some workshop plans in the CTMH book "Wishes" but I felt uninspired by them. Instead, Alyssa and I looked at all the cards in "Wishes" and picked out individual cards that appealed to us. It was a little more work but I am so pleased with what we came up with!

All these cards use the Mistletoe Level 2 paper packet and the Creative Basics Mistletoe Collection. The card above was my design, focusing on the papers themselves. The pretty little poinsettias are part of a collection called Mistletoe Level 2 Assortment. I adore them! The sentiment is from the Tannenbaum My Acrylix stamp set.


This card is Alyssa's design. The sentiment is from Christmas Melodies.

This is also Alyssa's design and also uses the Christmas Melodies My Acrylix stamp set. On both cards the berries are filled in using red stickles. So cute!

Another card by Alyssa. Did I mention I am starting to feel inadequate? LOL! I really love this stamp set, I Believe. It also has a reindeer, santa and sleigh, stocking & snow flakes. Very versatile!

And this card was designed by..... you guessed it! Alyssa! She used the My Acrylix stamp set, Adorn-able and added the pearl Opaques for a little added pop.

Final card was my design (finally!). If it seems familiar it's because it's one of the cards I featured on the November blog hop. This tree is alway a hit! The stamped and glittered trees are part of the Holiday Trinkets My Acrylix stamp set. The second generation stamping gives the appearance of depth, as if the trees are fading off into the mist.

If you are counting you may have noticed that I have only posted six cards. The final four are being held back and will be revealed December 1st for the December Paper Trail blog hop. Mark your calendars and check back for the remaining workshop cards. Thanks for stopping by!

Tuesday, November 9, 2010

Holiday Cards - Do You Still Send Them?


I've been participating in some craft shows this fall and along with my other items presenting cards for sale. They are not moving as well as I would have liked. I hope that doesn't mean people are not sending Holiday cards... I so love getting them!!
This is one of my favorites made with Mistletoe Level 2 paper pack. The glittery ribbon came with my Mistletoe Creative Basics. I've been investing more & more in corner and border punches, totally in love with them! Mary Jane taught me to do the accordion flower a few months ago and I have made tons of them since. Do you ever get "stuck" on something so fun you just have to keep making it? This card also includes My Acrylix stamps, St. Nick and Peace on Earth.


Did I tell you? Martha Stewart corner & border punches used for this card. I just can't resist! The beautiful musical paper is another part of the Mistletoe Level 2 paper pack. My Acrylix stamps are A Timber. Its a very sweet little set!


Two of our new colors are featured on this card, Pacifica and Sky. I used my Cuttlebug to emboss the card stock with snow flakes and then lightly sanded the top, leaving the white core to show. I love how easy it is to get this beautiful effect. My Acrylix stamps used on this card are from the Ice Crystals set.

This is one of my favorites! I love round cards and CTMH makes it so easy! I added paper from Magnifique Level 2 paper pack, using the pretty light patterned back of a much bolder pattern. I used the strip of embossed Pacifica cut off of the One of a Kind card and added my sponged, colored & glittered image from My Acrylix Snow Days and Thank You.

Thanks for stopping by. I hope you are sending real cards out this holiday season. Snail mail means so much more!

Monday, November 1, 2010

November Paper Trail Blog Hop - Mistletoe!


Welcome to the November edition of the Paper Trail blog hop! We are a group of Close To My Heart consultants working together to bring you cards, layouts, and other art featuring a different Close To My Heart paper packet each month. If you arrived here from Terri's My Frame of Mind you are on the right trail!

This month we are featuring the paper packet Mistletoe and it's beautiful holiday papers. I did some paper folded Christmas tree cards. The inspiration comes from Joyce. You can see her video here.
My daughter Alyssa got busy with Mistletoe and created a mini-album. It's a perfect size to put in a CD envelope and mail some holiday memories to family or friends.


A small Velcro tab holds the album closed.


Plenty of room for some journaling on the left - photo on the right.

Every page has room to tell the story of the photos you place inside.

The very center has room for 3 photos.

Close up of right side of center & Santa
.

I love the ornaments designed for a journaling spot!


And a lovely sentiment for the last page.

Thanks for stopping by. You're on your way to Karen's Inky Fingers blog now for some more great ideas. Just click on her blog.

Sunday, October 10, 2010

Bricks Along the Journey

Today was the silent auction called Bricks Along the Journey. It raises money for Breast Cancer. I am pleased and proud to tell you that both my brick and Krissy's bricks were bid on and went for $70 and $25 respectively. YAY!! We are so happy to do anything we can to help find the cure for this dreadful disease.

I am already looking forward to participating in next years auction and planning my brick. I may even find a brick and start now.

Friday, October 8, 2010

Close To My Heart Jewelry

Yes, that's right - I did say jewelry. Nothing fancy, just simple and fun to wear! Again I have used papers from the Olivia paper packet. I can't help but be drawn over and over again to the rich autumn colors of these papers!!

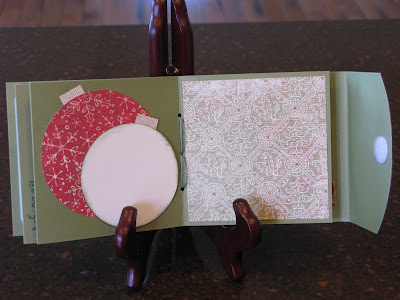
Each pendant starts with an every day metal washer. I used some Liquid Glass and covered the front of the pendant with my paper of choice. Once it dries, simply trim around the paper. So easy! For a little more finished look you can leave 1/4" of paper and wrap it around to the back of the washer and stick it down with more liquid glass. Snipping the paper into the washer every 1/8" inch or so will allow it to wrap nicely without any crinkles.

This first pendant I then sprayed with some shimmer mist. It doesn't show in the photo but it adds a real pretty sparkle!

After the paper is adhered to the washer and shimmer misted I then covered it entirely with a layer of Liquid Glass. This pendant I misted heavily with the shimmer mist. It dries in little pools this way, but I love the marbley look it made!

This last one I added some Opaques prior to the Liquid Glass. They could also be added when the LG is wet, but I wouldn't add them after it sets. Once the Liquid Glass has set completely (I usually give it over night before I start playing with them again) add a cord and any other accessories you may want. Fun to make, fun to wear! Let your imagination go wild with ideas!

Wednesday, October 6, 2010

And Yet Another Pumpkin! (Tutorial)


Welcome to my first ever photo tutorial. This comes as a result of my friend Shawnee asking that I post directions for this pumpkin on my Facebook page, Paper Boutique. I tried to take photos of every step and then decided that was far too many photos. I tried to weed a few out, but I still have a lot on here. How many it too many? I'm pretty much a visual person so that's a very hard question for me.

This is most of the supplies used for the project but a few more will come into play as we go along.

  • 3" Terracotta Pot
  • "Olivia" Paper Packet: 1 - 12" x 12" Backgound & Texture (B&T) paper (text weight) for pumpkin shell and 1 - 12" x 12" Terracotta color Card Stock (CS) for stem. B&T scrap for leaves
  • "Many Thanks" Stamp Set
  • Liquid Glass
  • Paper Trimmer
  • Circle Cutter
  • Spritzer


Putting together the pumpkin shell/base:

Select your B&T and cut a 7" x 12" piece. Then cut this piece into 7" strips. I cut mine into different thicknesses, of 1/2", 3/4" and 1". You can cut them into random thicknesses or all the same. One of my favorite qualities of CTMH B&T is that it's double sided. When putting my pumpkin together, the backside of the paper will show through and be a pretty orange, rather than plain old white. If you use paper that is white on the backside, consider sponging some color onto it.

Add a thin line of liquid glass to the back side of the end of one paper strip. Press it on the inside of the lip of the terracotta pot. Continue with each strip around the inside lip of the pot until all strips are used. The pieces should overlap a little. Be sure the 'right' side of the paper is all facing toward the middle of the pot. Liquid Glass is the perfect adhesive to use here. It dries very quickly so you don't have to hold the paper against the pot more than a few seconds. It also makes a very strong bond!

Turn the pot upside down and glue the strips to the bottom with more Liquid Glass. I placed my pot over a jar to keep the paper from being squished around the top. An alternate way to adhere the paper to the bottom is to put a long (1" or longer) brad through the hole in the bottom of the pot, punch a small hole in the end of each strip and secure it over the brad. Don't fret if your strips don't seem to be perfectly aligned. This is art, and the charm is in the imperfections!

Making the lid & stem parts:

Cut a 4" x 4" piece of B&T and CS and glue together. From this piece cut a 3-1/2" circle. Cut a second 3" circle from CS. Cut a 1-3/8" x 12" strip from CS. Score this strip every 1/4" and fold accordion style.
With Liquid Glass, glue the ends of your accordion strip together making a tube. Place a circle of glue on the smaller circle of CS using a thick, strong craft glue (I used Scotch Quick Dry adhesive). Flatten the accordion circle and place it over the glue on the circle. You can use a heavy object to hold it in place while the glue sets up.

This is how your accordion tube will look flattened out and glued to the circle of CS.

Make a cone using a scrap of CS. My scrap was about 3" x 4". I used redline tape to glue my cone.
Cut the large end of the cone to make an even opening.

Cut off the small tip of the cone and make short cuts up into the cone, about 1/2" and about 1/4" apart.
Bend these short pieces outward like a sunburst.

Place the narrow end of the cone on the center back of the large B&T/CS circle. Place a pencil inside the cone and draw a circle on the CS using the narrow end as your template.

Remove the cone. Using an exacto knife, make cross cuts from edge to edge through the pencil drawn circle. Bend back the points and flatten them against the CS using a folding tool. This is the hole that your stem will eventually go through.

Using Liquid Glass or the thicker Scotch glue, run a line around the edge and the inner edge of the large end of the cone.

Place the gluey edge on a scrap of CS and hold in place until secure. Allow to dry thoroughly.

When dry, trim off the scrap paper close to the cone. Sponge some ink onto your cone to create a distressed look for your stem.

Close the cuts of the smaller end of the cone and insert it into cut in the large B&T/CS circle from the B&T side. Open up the starburst cuts of the cone on the CS side and glue to the cardstock. You now have a stem & top to your pumpkin!

Making the leaves and vines:

I have to say this is my favorite part of the pumpkin process!! Stamp out three leaves in Pear ink on the lesser patterned B&T. I used the rock n roll method: ink up the stamp and lightly stamp it off on scratch paper. The "roll" the edges of the stamp only on the ink pad. Now stamp your image on the paper you want.

Cut two 12" x 1" strips from the green B&T. Cut out the leaves. Notice the pretty color on the back of the leaves. Again, this is what I love about CTMH papers. The leaf in the middle is turned over so you can see how the back complements the fall leaf look we are going for. How cool is that?

Now spray a leaf with the mister. Soggy is okay. Wrap a small portion of the leaf around a smooth slender object. I used my piercing tool. Any thing of this shape will work as long as it won't be damaged by heating. Using a heat embossing tool, heat the leaf until it's dry. The leaf will stay in the shape it is dried in. Experiment with twists and curves, it's so much fun and so perfect for autumn leaves! Repeat for all three leaves.

Spray one of the strips of B&T. Soggy is okay. Gently begin twisting the paper at one end and work your way to the other end being careful not to tear it. Try to get the underside of the paper to show in places as well.

Once the strip of paper is twisted, wrap it around the tool and set it with the heat embossing tool. It takes a little longer than the leaves because of the thickness. When it's set you can pull on the coil and it will bounce back. It it's not bouncing back heat it a little longer. You can take it off the tool to heat once it's got it's basic shape.

Final Assembly!
It's time to assemble the lid and embellish with leaves & vines! Run a line of thick glue around the bottom of the circle holding the stem, about 1/2" or more from the edge. Attach the accordion circle so that the accordion is between the two circles. Attach the leaves and vines to the top in a manner that appeals to you. I usually uncoil the vines slightly and wrap a little way around the base of the stem.

View of the lid from the bottom.

View of the lid from the top.

The completed project!