Saturday, July 31, 2010

Re-Carding?


I recently received a very pretty hand crafted wedding invitation. Designed with pretty pale blue glimmering paper and accented with glimmery black paper which had been embossed with a beautiful vine and bird embossing folder.


The papers were so pretty together I thought I really wanted to re-use them to make the wedding card I would give back to the bride and groom. However, I was at a bit of a loss as to whether it would be okay or if it would be tacky. Such a dilemma!


The invitation was clean & simple aka Classy. It was adorned with a single layered stamped medallion, which meant a fair amount of usable paper. Here is the original invitation both front and inside.

The embossed black strip & medallion are part of the back of the card and fold over the front from the back. That flap was three layers of heavy card stock and the black was nearly impossible to strip off. It certainly limited how I could use the piece.
The inside has a pocket for all the important little things you must include with invites... directions to the church, RSVP card, etc. That piece was also most firmly attached. Since I did have a bit of trouble separating them I had to alter from my original idea. Perhaps for the best.
My finished card. I used Twilight card stock from CTMH for the card base. A strip of the embossed black was attached to the lower edge. I cut two pieces of the shimmery pale blue and edge punched them. One was centered on the front over the black and the other was used inside the card to write my message on.

The flower was more difficult in trying to match the color. I used dream coat white paint and an old CTMH re-inker, Cloud Blue. I was hoping for more variation in depth of color but starting with such a light color it's hard to get very dark. After dabbing on paint and ink I sprayed it with shimmer mist, dried it with the heat tool and cut three different size flowers with my Cuttlebug. I scrunched the flowers up, un-scrunched them and added a thin coat of Liquid Glass. Although not exactly the result I was looking for I am pleased with it. It looks a little "rubbery" almost like I made it from Naugahyde.
I also tinted a large brad then clipped all the three flowers together with it. Layered with a black and thinner blue ribbon and three leaves cut from Twilight card stock and Ta-Da! my re-carded wedding card. Then, just before I was ready to put it in the envelope I added a bit of glitter to the brad. You can see that in the top photo.


I was still feeling a little unsure about 're-carding' but those fears went away at the reception. My family shared table with two couples, of which both the women are avid stampers and scrappers. I shared my secret with them and guess what.... they both made their wedding cards for the bride and groom from the invitations!! I hope I get a chance to see them!! By the way, the photo makes the flower look pinkish - it's not.

Saturday, July 17, 2010

Super Secret Swap Cards!


I can't believe after all this time of dying to share my swap cards with you, I totally spaced it! It's been almost a week since I've been back from convention and I am just barely beginning to feel like my old self. Wow, no one told me "recovery" takes so much longer once you break that 50 year mark!


The first card I created for convention swapping was designed using a stamp set I am absolutely in love with. I love the card, as well, but the logistics soon proved to be far too much for my feeble time frame. I embossed the Key and Key Hole in gold on Cocoa and then cut them out, including the hole in the handle of the key. FAR too much work for mass production.
When opened into an easel card there was more detail work in the form of torn paper, brads, Cuttlebug cut circles (Nestibilities), sigh... I just didn't have the time to devote all that attention to too many cards. I ended up with a few more than 20 of this design.
Moving on to what I thought would be less time consuming I created this:

I started with wedding coasters I purchased on clearance at Michael's and covered them with our papers. I used A Tweet for the stamped image and negatively sponged a hot little sun in the background.

I wanted an item that was a souvenir of convention so I used my Cricut to create the Washington DC frame on the back and more CTMH stamps for the month & circled days. I love how it turned out!
And to me, the best, most fun part of all, is that it's not a card, but a fan! I don't know about anyone else but mine did get a little action during general session. I can always count on being too warm sometime during the events!

Friday, July 16, 2010

Brain on Overload!

Close to my Heart convention never fails to hype me up and inspire me.

Then I return home.

Oh My Gosh. So much to see and do and make... I simply have not been able to assimilate it all yet. Not to mention we got to DC three days early to spend time sight seeing in very hot weather. You know that feeling that you need a vacation to recover from your vacation? Um, yeah....

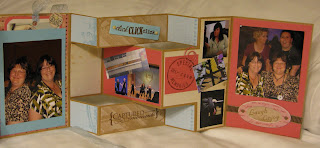
As usual, Close to my Heart has some super great things coming up with the September release of our Autumn/Winter Idea Book and I can't wait to share it all with you. But for now I will remain mum and share what I made for roomie gifts instead. I created 3 mini albums using the tri-fold shutter card as the base. I love Love LOVE how they turned out!! I snuck out one afternoon to get photos printed and placed in the albums before I gave them away. That part may have been a mistake... not that it didn't make the albums more special, I think it did, but I absolutely hate missing any of convention!!
The paper I used for this album was from our Notebook pack. It always stumps me at first when I try using this pack, but I always love the results!

This is what the album looks like with just the front flaps open.

When the mini album is fully open, this is the left "wing" including the center photo, on the far right.

Here is the right wing, with the center photo now on the far left.

This is the center shot of the album. I didn't write on the tag slipped behind the center photo. I thought the recipient of the album should use it to write their own thoughts about convention and their roommate experience. The back of the album is quite plain, but I did stick a photo of me on the back and write a short, very brief note.

Thursday, July 1, 2010

A Bit of Eye Candy

Seems like all I have been doing is getting things ready for the Close to My Heart convention which is about to happen in Washington DC. It's taken my attention away from making things I can share. Instead I have been in the land of top secret swap cards and roomie gifts. If I show you any of that stuff before the opening of convention, I'd have to kill you - and we wouldn't want that!!

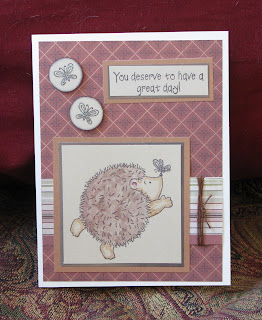
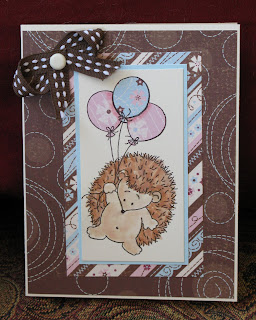
Since Jackpot June has come to an end I thought I should do something with the July Stamp of the Month and show you just how stinkin' cute it is. So I made up a couple of cards for your crafting pleasure....
The set is called "Happy Forever" and features four of the cutest little ground hogs. The first card I did with our Passages papers. I used glitter on all three butterflies, but alas, glitter is shy when it comes to being photographed!

This second card was done with our Top Stitch papers. It was originally one of my lesser loved papers, but after using it I have come to appreciate it and moved it way up on my list of favorite papers. So cute!